Moist Vanilla Bundt Cake Secrets Every Baker Needs
The Ultimate Vanilla Bundt Cake Guide: Part 1
Let's be honest—there's something magical about a perfectly baked vanilla bundt cake. That moment when you flip the pan and hold your breath... will it release? Will it maintain that gorgeous sculptural shape? For home bakers with big dreams (that's you!), mastering the vanilla bundt cake is like earning your first culinary merit badge—simple enough to attempt, yet tricky enough to feel accomplished when you nail it.
At DI ORO, we believe creating in the kitchen should be joyful, not frustrating. And while we're known for our award-winning spatulas and kitchen tools, today we're diving into the delicious world of vanilla bundt cakes—those gorgeously shaped, moist, and versatile desserts that have graced family tables for generations.
Why Vanilla Bundt Cakes Deserve Your Attention
The vanilla bundt cake is the little black dress of desserts—timeless, adaptable, and always appropriate. Whether you're hosting a casual brunch or need something special for a celebration, this classic never disappoints. The beauty lies in its simplicity—vanilla's complex flavor profile shines when it doesn't have to compete with other ingredients, creating a canvas that's both delicious on its own and ready to be dressed up.
But let's address the elephant in the room: vanilla bundt cakes have a reputation for being dry. We're here to shatter that myth and show you exactly how to achieve that elusive moist texture that keeps everyone coming back for seconds (and thirds).
The Science Behind a Moist Vanilla Bundt Cake

Creating a vanilla bundt cake that stays moist for days isn't just luck—it's science. The perfect moisture level comes from understanding the delicate balance between fats, liquids, and dry ingredients. Too much flour and you'll end up with a desert-dry cake. Too much liquid and you'll have a soggy mess that never properly sets.
The key players in moisture retention include:
- Fat content: Butter provides flavor while oil helps retain moisture longer
- Dairy additions: Sour cream, yogurt, or buttermilk add tenderness and prevent dryness
- Sugar ratio: Beyond sweetness, sugar is hygroscopic—it attracts and holds moisture
- Mixing technique: Overmixing develops gluten, creating a tough texture
The Essential Ingredients for Vanilla Bundt Cake Success
Let's break down what you'll need for a vanilla bundt cake that makes people swoon:
For the Cake:
- 3 cups all-purpose flour (properly measured—we'll get to that)
- 1 teaspoon baking powder
- ½ teaspoon baking soda
- ½ teaspoon salt
- 1 cup (2 sticks) unsalted butter, softened
- 2 cups granulated sugar
- 4 large eggs, room temperature
- 2 tablespoons pure vanilla extract (yes, tablespoons!)
- 1 cup full-fat sour cream
For a Simple Vanilla Glaze:
- 2 cups powdered sugar
- 3-4 tablespoons milk or heavy cream
- 1 teaspoon vanilla extract
- Pinch of salt
Notice something? Quality matters here. When making a vanilla bundt cake, the vanilla itself isn't just a supporting player—it's the star of the show. This is where you break out the good stuff. Pure vanilla extract (not imitation) makes a world of difference in the final flavor.
The Vanilla Bundt Cake with Cake Mix Shortcut
While we're all about scratch baking, we're also realists. Sometimes you need a spectacular dessert but don't have hours to spend in the kitchen. Enter the doctored cake mix approach—a clever hack that transforms a humble box mix into something that tastes homemade.
For a quick but impressive vanilla bundt cake with cake mix:
- 1 box vanilla cake mix
- 1 small box instant vanilla pudding mix
- 4 large eggs
- ½ cup vegetable oil
- 1 cup water or milk
- 1 tablespoon vanilla extract
- ½ cup sour cream
The pudding mix is the secret weapon here—it adds moisture and creates that dense-yet-tender crumb that's characteristic of great bundt cakes. The extra vanilla and sour cream elevate the flavor beyond what you'd expect from a box mix.
Mastering the Technique: How to Make a Moist Vanilla Bundt Cake
Now that we've covered ingredients, let's talk technique. Even with perfect ingredients, the wrong approach can lead to disappointment. Here's how to ensure success:
Proper Measuring: The Foundation of Baking
Before you even turn on the mixer, make sure you're measuring correctly. Flour is the biggest culprit in dry cakes—when scooped directly with a measuring cup, you can pack in up to 25% more than the recipe intends! Instead, use the spoon-and-level method: spoon flour into your measuring cup and level it off with a straight edge (the back of a knife works perfectly).
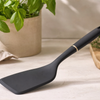
This is where DI ORO's Seamless Silicone Spatula becomes your best friend—its flexible edge is perfect for leveling dry ingredients without compacting them. Plus, when you're scraping down the mixing bowl later, its heat-resistant, forever-chemical-free silicone ensures you're folding in every bit of batter without introducing anything harmful to your cake.
Room Temperature Ingredients: Not Just Baker's Snobbery
When a recipe calls for room temperature ingredients, it's not just being fussy. Cold eggs and dairy don't incorporate properly, leading to a lumpy batter that bakes unevenly. Set your refrigerated ingredients out about an hour before baking, or speed things up by placing eggs in warm (not hot) water for 5-10 minutes.
Room temperature butter should be soft enough that your finger leaves a slight indent when pressed, but not so soft that it's shiny or melting. This consistency allows it to cream properly with sugar, creating the air pockets that give your cake structure.
The Mixing Method: Gentle Does It
For a moist vanilla bundt cake, the mixing technique is crucial:
- Cream butter and sugar until light and fluffy (3-5 minutes on medium speed)—don't rush this step!
- Add eggs one at a time, incorporating fully between additions
- Alternate adding dry ingredients and sour cream, beginning and ending with dry ingredients (typically three additions of dry, two of wet)
- Mix just until combined after each addition—overmixing activates gluten, creating a tough cake
The final batter should be smooth and thick—not pourable like a box mix, but not as stiff as cookie dough either. It should slowly fall from your spatula in ribbons.
Pan Preparation: The Make-or-Break Moment
The intricate design that makes bundt cakes so beautiful also makes them notorious for sticking. Proper pan preparation is non-negotiable:
- Use a non-stick bundt pan in good condition (scratched pans are more likely to stick)
- Apply a thin, even coat of solid shortening or butter to EVERY nook and cranny
- Dust with flour, tapping out excess (or use a baking spray with flour)
- For chocolate cakes, dust with cocoa powder instead of flour to avoid white residue
Take your time with this step—it's the difference between a stunning presentation and a pile of delicious crumbs.
Baking Your Vanilla Bundt Cake to Perfection

Even with the perfect batter, baking requires attention to detail:
- Preheat your oven thoroughly—at least 20 minutes before baking
- Position the rack in the center of the oven for even heat distribution
- Bake at 325°F (not 350°F) for more even baking through the thick batter
- Start checking for doneness at the minimum baking time, but don't open the oven door before that
- Test with a wooden skewer or thin knife inserted in the deepest part of the cake—it should come out clean or with a few moist crumbs
The cooling process is just as important as the baking. Allow your vanilla bundt cake to cool in the pan for exactly 10 minutes—not more, not less. This timing allows the cake to set enough to hold its shape but still be warm enough to release from the pan without sticking.
The Perfectly Moist Vanilla Bundt Cake: From Mixing to Masterpiece
Now that we've covered the fundamentals, let's dive into the heart of creating that dream vanilla bundt cake—one that's so moist it practically melts in your mouth. I've tested countless methods in my kitchen (and cleaned up more than a few flops with my trusty DI ORO spatula), and I'm here to share exactly what works and why.
The Mixing Method That Changes Everything
The way you combine your ingredients isn't just a suggestion—it's the difference between cake nirvana and a disappointing doorstop. For a vanilla bundt cake with that perfect crumb, follow this method religiously:
Start by creaming your butter and sugar together until truly light and fluffy—and I mean really fluffy. We're talking 4-5 minutes of mixing, not the quick 30-second blend many of us are guilty of rushing through. This process isn't just combining ingredients; it's creating millions of tiny air pockets that give your cake structure and lightness.
When you add eggs, go one at a time and mix for a full 30 seconds between each addition. This prevents the batter from curdling and ensures each egg is fully incorporated before the next one joins the party. Your batter should look smooth and satiny—almost like vanilla pudding at this stage.
The Secret "Moisture Insurance Policy"
Here's where many vanilla bundt cake recipes fall short: they don't include enough moisture insurance. My foolproof approach combines multiple moisture-retaining ingredients:
- Sour cream adds tanginess while keeping the crumb tender for days
- A touch of vegetable oil (2-3 tablespoons) alongside the butter helps prevent dryness as the cake cools
- An extra egg yolk provides richness and helps emulsify the batter
This triple threat of moisture-makers ensures your vanilla bundt cake stays fresh and delicious even three days after baking—if it lasts that long!
Avoiding the 5 Classic Vanilla Bundt Cake Disasters

Let's talk about what can go wrong and how to prevent it. After all, nothing's more disappointing than a bundt cake catastrophe after all that mixing and measuring.
Disaster #1: The Dreaded Stick
You've baked the perfect vanilla bundt cake, it smells divine, but when you flip it... half stays stubbornly in the pan. We've all been there, and it's heartbreaking.
Beyond the thorough greasing we discussed earlier, timing is everything. Let the cake cool exactly 10 minutes—set a timer! Too short, and it's too soft to hold its shape; too long, and it starts to adhere to the pan like superglue. If disaster strikes anyway, run a thin silicone spatula (our DI ORO Mini Spatula is perfect for this) around the edges and center tube before inverting.
Disaster #2: The Sunken Center
Nothing deflates your baking confidence like a cake that caves in the middle. This usually happens when:
- Your leavening agents are expired (baking powder loses potency after 6-12 months)
- The batter was overmixed, developing too much gluten
- The oven door was opened during the first 20 minutes of baking
- The cake was underbaked and collapsed when cooling
The fix? Check those expiration dates, mix gently, keep that oven door closed, and use the skewer test to ensure proper doneness.
Disaster #3: The Overly Dense Crumb
A good vanilla bundt cake should be substantial but not heavy. If yours resembles pound cake when you wanted something lighter, you might have:
- Undermixed the butter and sugar (remember that crucial 4-5 minutes!)
- Added too much flour (this is where proper measuring saves the day)
- Used cold ingredients that couldn't incorporate properly
The DI ORO Seamless Silicone Spatula, with its flexible edge and comfortable grip, makes proper folding technique so much easier—helping you achieve that perfect balance between undermixing and overmixing.
Disaster #4: The Flavor Fade
Have you ever had a vanilla bundt cake that looked gorgeous but tasted... meh? Vanilla is subtle, and its flavor can easily get lost. To ensure your cake delivers that aromatic vanilla punch:
- Use pure vanilla extract, not imitation (the price difference is worth it)
- Add vanilla bean paste or the seeds from a real vanilla bean for visible flecks and intense flavor
- Consider "double vanilling"—add half the vanilla to the wet ingredients and the other half after everything is mixed
For an extra flavor boost, add a teaspoon of vanilla to your glaze as well—this layering of vanilla notes creates depth that makes people wonder what your secret ingredient is.
Disaster #5: The Cracked Top
While this will be the bottom when inverted, a severely cracked top can affect the cake's structure. This typically happens when:
- Your oven temperature is too high (invest in an oven thermometer—many run hot!)
- The batter was overmixed, creating too much air that expands dramatically
- The pan was overfilled (never fill more than 2/3 full)
A small crack isn't the end of the world—that's what glaze is for! But preventing major structural issues ensures your vanilla bundt cake will stand tall and proud on your serving plate.
Elevating Your Vanilla Bundt Cake with Mix-Ins and Glazes
The beauty of a classic vanilla bundt cake is its versatility. Once you've mastered the basic recipe, the possibilities for customization are endless.
Seasonal Mix-Ins That Wow
Transform your vanilla bundt cake with these seasonal additions:
- Spring: Fold in 2 tablespoons of lemon zest and 1 cup of fresh blueberries
- Summer: Add 1 cup of chopped fresh peaches and a teaspoon of cinnamon
- Fall: Incorporate 1 cup of diced apples and 2 teaspoons of apple pie spice
- Winter: Mix in 1/2 cup of white chocolate chips and 1/2 cup of dried cranberries
The trick with add-ins is to toss them in a tablespoon of your measured flour before folding them in. This coating prevents them from sinking to the bottom (which becomes the top when inverted).
Glaze Techniques That Make Jaws Drop
A beautiful glaze is the crown jewel of any vanilla bundt cake. Here's how to nail it:
- Make sure your cake is completely cool before glazing
- Place the cake on a wire rack over a baking sheet to catch drips
- For a thin, translucent glaze, use warm liquid; for a thicker, opaque glaze, use less liquid
- Pour from the center outward in a circular motion
- For a bakery-worthy finish, apply a second coat after the first has set
My favorite technique is the "double drizzle"—a white vanilla glaze applied first, followed by a contrasting chocolate or caramel drizzle. The DI ORO Small Spatula makes controlling these drizzles a breeze, giving you that professional-looking finish that makes everyone reach for their phones before they reach for a slice.
Storing Your Vanilla Bundt Cake for Maximum Moisture

All that work deserves to be preserved! To keep your vanilla bundt cake at peak moisture and flavor:
- Allow the cake to cool completely before storing
- For unglazed cakes, wrap tightly in plastic wrap, then aluminum foil
- For glazed cakes, place in an airtight container tall enough not to touch the glaze
- Store at room temperature for up to 3 days
- Refrigerate for up to a week (bring to room temperature before serving)
- Freeze unglazed cakes for up to 3 months (glaze after thawing)
A clever hack: place half an apple in the container with your cake. The apple releases moisture that keeps the cake fresh longer (just replace it every day).
Reviving Day-Old Vanilla Bundt Cake
Even the moistest vanilla bundt cake can dry out a bit after a few days. To bring it back to life:
- Place a slice in the microwave with a small cup of water for 10-15 seconds
- For a more decadent approach, warm a slice and top with vanilla ice cream
- Transform leftover cake into a trifle by layering with whipped cream and berries
Remember, a slightly dry vanilla bundt cake still makes an excellent base for bread pudding—just cube it, soak in custard, and bake until golden. Kitchen magic at its finest!
The Vanilla Bundt Cake Recipe You'll Make Again and Again
Now that we've covered all the techniques, tips, and troubleshooting, let's put it all together with my go-to vanilla bundt cake recipe—the one that never fails to impress and has converted even the most devoted chocolate lovers.
This recipe incorporates all our moisture-retaining secrets and flavor-boosting techniques. It's the culmination of countless tests and tweaks, resulting in what I believe is the perfect vanilla bundt cake—one that's worthy of being your signature dessert.
The beauty of mastering this vanilla bundt cake is that it becomes a canvas for your creativity. Once you understand the science behind what makes it work, you can confidently experiment with flavors, glazes, and presentations while maintaining that perfect moist texture that keeps everyone coming back for more.
And remember—the right tools make all the difference. Our DI ORO Seamless Silicone Spatulas, with their heat-resistant, forever-chemical-free design, are the perfect companions for your baking adventures. From scraping every last bit of that precious vanilla-flecked batter to applying the perfect glaze, quality tools elevate both the process and the result.
The Ultimate Vanilla Bundt Cake Recipe

After all our talk about technique and troubleshooting, it's time to put everything into practice with this foolproof vanilla bundt cake recipe. This isn't just any recipe—it's the culmination of countless kitchen experiments, happy accidents, and yes, a few spectacular failures that taught me what really works. My DI ORO spatulas have scraped more bowls of this batter than I can count!
Perfect Vanilla Bundt Cake
Ingredients:
- 3 cups (375g) all-purpose flour, spooned and leveled
- 1 teaspoon baking powder
- ½ teaspoon baking soda
- 1 teaspoon salt
- 1 cup (226g) unsalted butter, room temperature
- 2 cups (400g) granulated sugar
- 4 large eggs plus 1 egg yolk, room temperature
- 2 tablespoons pure vanilla extract (yes, tablespoons!)
- ¾ cup (180g) sour cream, room temperature
- ¼ cup (60ml) vegetable oil
- ½ cup (120ml) whole milk, room temperature
For the vanilla glaze:
- 2 cups (240g) powdered sugar, sifted
- 3-4 tablespoons heavy cream or milk
- 1 teaspoon vanilla extract
- Pinch of salt
The Foolproof Method
- Preheat your oven to 325°F (165°C). Thoroughly grease a 10-12 cup bundt pan with baking spray or butter and flour.
- In a medium bowl, whisk together flour, baking powder, baking soda, and salt. Set aside.
- In your stand mixer with the paddle attachment (or a large bowl with a hand mixer), cream butter and sugar for a full 5 minutes until extremely light and fluffy. Don't shortcut this step!
- Add eggs one at a time, mixing for 30 seconds after each addition. Add the extra yolk and mix well.
- Add vanilla extract and mix until incorporated.
- In a separate bowl, whisk together sour cream, oil, and milk.
- With the mixer on low, add ⅓ of the flour mixture, then half the sour cream mixture, another ⅓ of flour, remaining sour cream, and finish with the last ⅓ of flour. Mix just until combined.
- Remove the bowl from the mixer and give the batter a final gentle fold with your DI ORO Seamless Silicone Spatula, making sure to scrape the bottom and sides of the bowl.
- Pour batter into the prepared pan, smoothing the top. Tap the pan gently on the counter a few times to remove air bubbles.
- Bake for 55-65 minutes or until a long skewer inserted in the center comes out clean or with a few moist crumbs.
- Cool in the pan for exactly 10 minutes, then invert onto a cooling rack and allow to cool completely before glazing.
For the glaze, whisk all ingredients together until smooth, adjusting consistency with more liquid or powdered sugar as needed. Drizzle over the cooled cake, letting it cascade down the ridges for that picture-perfect finish.
Taking Your Vanilla Bundt Cake to the Next Level
Once you've mastered the basic recipe, why not explore these gourmet variations? Each builds on our perfect base while introducing exciting new flavor profiles.
Brown Butter Vanilla Bean Bundt Cake
For an elevated vanilla experience, brown the butter before creaming it with sugar. Let the browned butter solidify back to room temperature consistency first. Add the seeds from one vanilla bean along with the extract for visible flecks and intense flavor. The nutty notes from the brown butter create a sophisticated depth that makes this cake unforgettable.
Vanilla Bundt Cake with Lemon Curd Filling
Create a tunnel of sunshine by filling your vanilla bundt cake with lemon curd. Pour half the batter into your prepared pan, create a trench with the back of your DI ORO spoonula, fill with 1 cup of lemon curd, then top with remaining batter. The contrast between mellow vanilla cake and bright lemon curd creates a delightful surprise with every slice.
Vanilla Chai Bundt Cake
Add 2 tablespoons of chai spice blend (cardamom, cinnamon, ginger, cloves, and black pepper) to the dry ingredients for a warm, aromatic twist on the classic vanilla bundt. Top with a simple vanilla glaze infused with a touch more cinnamon for a cake that's perfect with afternoon tea.
Vanilla Bundt Cake for Special Diets
Everyone deserves great cake! Here's how to adapt our vanilla bundt cake recipe for common dietary needs without sacrificing that perfect texture.
Gluten-Free Vanilla Bundt Cake
Substitute the all-purpose flour with a high-quality cup-for-cup gluten-free flour blend that contains xanthan gum. Add an extra egg to provide structure and ¼ teaspoon of xanthan gum if your blend doesn't include it. The cake may need 5-10 minutes more in the oven, so watch it carefully.
Dairy-Free Vanilla Bundt Cake
Replace butter with plant-based butter sticks (not spread), sour cream with coconut yogurt, and milk with almond or oat milk. The texture will be slightly different but still delicious. For the glaze, use coconut cream and a touch of coconut oil for richness.
Reduced-Sugar Vanilla Bundt Cake
Cut sugar to 1½ cups and add an extra 2 tablespoons of sour cream to maintain moisture. The cake will be less sweet but will still have a beautiful texture. Consider using a glaze with reduced sugar or a light dusting of powdered sugar instead.
The Science Behind a Perfect Vanilla Bundt Cake
Understanding the "why" behind baking techniques helps you become a better baker. Here's what's happening in your vanilla bundt cake at each stage:
The Creaming Magic
When you cream butter and sugar, you're not just combining ingredients—you're creating an emulsion that traps air. These air pockets expand during baking, creating lift and lightness. This is why room temperature butter and that full 5 minutes of creaming are non-negotiable for a properly risen cake.
The Protein Balance
Eggs provide structure through their proteins, which coagulate during baking to form the cake's framework. The extra yolk adds fat and emulsifiers that create a more tender crumb. Meanwhile, the flour's proteins form gluten when mixed with liquid, which can toughen the cake if overdeveloped—hence our careful mixing approach.
The Moisture Retention System
Sour cream's fat content and acidity tenderize the crumb while adding moisture. The vegetable oil coats flour proteins, limiting gluten development and creating a cake that stays moist for days. This dual approach to moisture is what separates good vanilla bundt cakes from truly great ones.
When you understand these principles, you're no longer just following a recipe—you're baking with intention and knowledge, able to troubleshoot and adapt as needed.
Serving Your Vanilla Bundt Cake with Style
A beautiful vanilla bundt cake deserves a presentation that matches the care you put into baking it. Here are some ideas to make your cake the star of any gathering:
Elegant Serving Suggestions
- Place your glazed bundt on a cake stand with fresh seasonal berries cascading down the sides and around the base
- Serve slices with a quenelle of freshly whipped cream and a tiny sprig of mint
- For dinner parties, plate individual slices with a drizzle of complementary sauce (raspberry coulis, caramel, or chocolate) using your DI ORO Mini Spatula for precision
- Create a dessert bar with your vanilla bundt cake as the centerpiece, surrounded by different toppings guests can add themselves
Perfect Pairings
- A scoop of salted caramel ice cream alongside a warm slice
- Fresh berries macerated with a touch of sugar and lemon
- A drizzle of aged balsamic reduction for the adventurous
- A cup of freshly brewed coffee or espresso to balance the sweetness
- Champagne or prosecco for celebrations—the bubbles cleanse the palate between bites
Final Thoughts: Why Vanilla Bundt Cake Will Never Go Out of Style
The vanilla bundt cake is a timeless dessert that brings people together with its comforting flavor and classic charm. With the tips we've covered—and reliable tools like DI ORO's award-winning spatulas—you’re ready to create a signature cake everyone will remember. Great baking is about more than recipes; it’s about technique, quality ingredients, and your personal touch.
For more inspiration, try our Banana Pudding Brownies or Coconut Sorbet. Explore our Best Sellers for top kitchen tools and visit our Limited-Time Offers for great deals. Need savory ideas? Try our Baked Rigatoni or Top Round Roast Recipe. Want more bundt cake tips? Check out Bakes by Brown Sugar and Lifestyle of a Foodie.
Frequently Asked Questions
how to make a vanilla bundt cake
To make a vanilla bundt cake, start by preheating your oven and greasing your bundt pan thoroughly. In a bowl, cream together butter and sugar until light and fluffy, then add eggs one at a time, mixing well. Combine flour, baking powder, and salt separately, then alternate adding the dry ingredients and milk to the butter mixture, stirring until smooth. Pour the batter into the pan and bake until a toothpick inserted comes out clean, then let it cool before removing and serving.

