Mint Chocolate Chip Ice Cream Cake: 5 Foolproof Steps
Picture this: you're hosting a summer gathering, and you want to serve something that'll make everyone's eyes light up—something that screams "I've got my dessert game figured out." Enter the mint chocolate chip ice cream cake, a showstopper that combines the refreshing coolness of mint with rich chocolate in perfect harmony.
This isn't just any dessert; it's a layered masterpiece that looks like you spent hours in the kitchen but actually comes together with surprisingly simple techniques.
Key Takeaways
- The mint chocolate chip ice cream cake is a perfect dessert for summer gatherings.
- This dessert combines refreshing mint flavor with rich chocolate for a harmonious taste.
- The cake is a layered masterpiece that appears complex but is easy to make.
- Simple techniques are used to create a showstopping dessert that impresses guests.
Table of Contents
- Why Mint Chocolate Chip Ice Cream Cake Works Every Time
- Essential Ingredients for Mint Chocolate Chip Ice Cream Cake Success
- Mastering the Technique: Assembly Fundamentals
- 5 Foolproof Assembly Steps for Mint Chocolate Chip Ice Cream Cake
- Pro Tips for Mint Chocolate Chip Ice Cream Cake Perfection
- Serving and Storage Excellence
- Beyond the Basic Mint Chocolate Chip Cake
- Your Mint Chocolate Chip Ice Cream Cake Success Story
A mint chocolate chip ice cream cake is essentially a no-bake (or semi-baked) layered dessert that transforms your favorite ice cream flavor into an elegant cake experience. Think of it as the sophisticated cousin of the birthday ice cream cake—one that brings together creamy mint ice cream, crunchy chocolate cookie layers, and luscious toppings in a way that's both nostalgic and impressively grown-up.
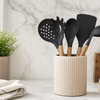
What makes this dessert particularly brilliant is its versatility. Whether you're celebrating St. Patrick's Day with that perfect mint-green hue, hosting a summer birthday party, or just wanting to surprise your family with something special, this cake delivers on both flavor and visual impact. Plus, with the right tools—like DI ORO's award-winning silicone spatulas that won't scratch your pans or melt under pressure—the assembly process becomes as smooth as the ice cream itself.
Why Mint Chocolate Chip Ice Cream Cake Works Every Time
The beauty of a mint chocolate chip cake lies in its forgiving nature. Unlike temperamental soufflés or finicky layer cakes that require precise timing and technique, this dessert actually gets better with time in the freezer. The flavors meld, the textures set perfectly, and you get that satisfying contrast between the cool, creamy interior and any crunchy elements you've added.
The mint-chocolate combination isn't just delicious—it's scientifically smart. The cooling sensation of mint naturally complements the richness of chocolate, creating what food scientists call "flavor balance." Your taste buds get the indulgence they crave from chocolate while the mint keeps things from feeling too heavy. It's like having a palate cleanser built right into your dessert.
From a practical standpoint, this cake solves the eternal dinner party dilemma: how to serve something impressive without spending your entire day in the kitchen. Most mint chocolate chip ice cream cake recipes can be assembled in under 30 minutes of active work, then left to do their thing in the freezer while you focus on other aspects of your meal. For more inspiration on assembling frozen desserts, check out this detailed mint chocolate chip ice cream cake recipe by Desserts on a Dime.
essential-ingredients-for-mint-chocolate-chip-ice-cream-cake-success">Essential Ingredients for Mint Chocolate Chip Ice Cream Cake Success

The foundation of any great mint chocolate chip ice cream cake starts with quality ingredients, but here's the thing—you don't need to make everything from scratch to achieve professional-level results. Smart shortcuts can actually enhance your final product when chosen thoughtfully.
Choosing Your Ice Cream Base
Your ice cream choice sets the entire tone for your cake. Premium store-bought mint chocolate chip ice cream works beautifully—brands like Häagen-Dazs or Ben & Jerry's provide that rich, dense texture that holds up well in cake form. If you're feeling ambitious, homemade ice cream gives you complete control over the mint intensity and chocolate chip distribution, but honestly? Save your energy for the assembly and presentation.
The key is using ice cream with real vanilla bean base and natural mint flavoring rather than artificial alternatives. You'll taste the difference, and your guests will too. Look for ice cream that has a good chocolate chip-to-ice-cream ratio—you want those little bursts of chocolate in every bite.
Building the Perfect Cookie Crust
The crust provides textural contrast and structural integrity for your cake. Classic chocolate sandwich cookies (think Oreos) are the traditional choice, but mint-flavored Oreos take the theme up a notch. The beauty of using cookies is that they're already sweetened and flavored—you're essentially creating an instant graham cracker crust without the fuss.
For the perfect crust consistency, you'll want fine, even crumbs mixed with just enough melted butter to hold everything together when pressed. Too much butter and your crust becomes soggy; too little and it crumbles apart when you try to slice the cake. The sweet spot is about 1/4 cup of melted butter per sleeve of cookies.
Toppings and Finishing Touches
This is where you can really let your creativity shine. Whipped cream provides a classic, elegant finish, while chocolate ganache adds decadent richness. For texture enthusiasts, consider crushed peppermint candies, mini chocolate chips, or even crumbled cookies as garnish.
Fresh mint leaves aren't just pretty—they provide an aromatic element that enhances the mint flavor before you even take a bite. Chocolate shavings or a drizzle of chocolate sauce create visual drama and reinforce the chocolate component of your flavor profile.
Mastering the Technique: Assembly Fundamentals
The difference between a good mint chocolate chip ice cream cake and a great one often comes down to technique. It's not complicated, but there are specific steps that ensure your cake looks professional and slices cleanly.
Ice Cream Temperature: The Goldilocks Zone
Getting your ice cream to the right consistency for spreading is crucial. You want it soft enough to spread smoothly without tearing your crust, but not so melted that it loses its structure. The ideal approach is to move your ice cream from freezer to refrigerator about 15-20 minutes before you plan to assemble your cake.
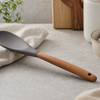
Here's where having the right tools makes all the difference. A high-quality offset spatula—like those in DI ORO's collection—gives you the control you need to spread ice cream evenly without applying too much pressure. The silicone won't scratch your pan, and the flexible blade follows the contours of your cake perfectly. For more on why the right spatula matters, see The Ultimate Spatula Guide from DI ORO.
Test the consistency by pressing gently with your spatula. If it gives slightly but holds its shape, you're in the sweet spot. If it's still rock-hard, give it a few more minutes. If it's getting soupy, pop it back in the freezer for 10 minutes.
Layering Strategies for Professional Results
Professional bakers know that even layers are the secret to cakes that photograph beautifully and slice cleanly. Start with your crust pressed firmly and evenly in the bottom of your pan—a springform pan is your best friend here for easy removal and clean presentation.
When adding your ice cream layer, work from the center outward, using gentle, sweeping motions. Don't worry about getting it perfect on the first pass; you can smooth and refine as you go. The goal is an even thickness throughout, typically about 1-2 inches depending on your pan size and desired proportions.
If you're adding multiple layers—perhaps alternating ice cream with cookie crumbs or fudge—freeze each layer for about 30 minutes before adding the next. This prevents layers from bleeding into each other and maintains those clean, distinct lines that make your cake look professionally made.
The final freeze is where patience pays off. A minimum of 4 hours allows everything to set properly, but overnight is even better. This isn't just about firmness—it's about allowing flavors to meld and textures to reach their optimal state. Your mint chocolate chip ice cream cake will slice like a dream and hold its shape beautifully on the plate.
5 Foolproof Assembly Steps for Mint Chocolate Chip Ice Cream Cake

Ready to transform your ingredients into a showstopping mint chocolate chip ice cream cake? These five steps will guide you through the process with the confidence of a seasoned pastry chef, even if this is your first time tackling an ice cream cake project.
Step One: Create Your Cookie Foundation
Start by crushing about 24-30 chocolate sandwich cookies into fine, uniform crumbs. A food processor makes quick work of this, but if you don't have one, place the cookies in a sealed plastic bag and roll over them with a rolling pin—it's surprisingly therapeutic and gives you complete control over the texture.
Mix your cookie crumbs with 1/4 cup of melted butter until the mixture resembles wet sand and holds together when squeezed. Press this mixture firmly into the bottom of a 9-inch springform pan, using the bottom of a measuring cup to create an even, compact layer. The key here is consistent pressure—you want a crust that won't crumble when you slice the cake later.
Pop your crust into the freezer for 15 minutes while you prepare the ice cream. This brief freeze sets the foundation and prevents it from mixing with your ice cream layer during assembly.
Step Two: Master the Ice Cream Layer
Remove your mint chocolate chip ice cream from the freezer and let it soften slightly—about 10-15 minutes at room temperature. You're looking for that sweet spot where it's spreadable but not melty. Think of the consistency of thick frosting rather than soup.
Using a large spoon or ice cream scoop, dollop the softened ice cream over your chilled crust. Here's where technique matters: start from the center and work outward using gentle, overlapping strokes with your spatula. DI ORO's seamless silicone spatulas are perfect for this job—their flexibility allows you to follow the pan's contours while their heat-resistant properties mean they won't be affected by the temperature contrast.
Aim for an even layer about 1.5 inches thick. Don't stress about perfection on your first pass; you can smooth and refine as you work. The goal is consistent thickness throughout, which ensures even freezing and clean slicing later.
Step Three: Add Texture and Flavor Layers
This is where your mint chocolate chip cake goes from good to extraordinary. Consider adding a middle layer of chocolate fudge sauce, caramel, or even crushed mint candies for textural interest. If you're using a sauce, drizzle it evenly over your ice cream layer, leaving about a half-inch border around the edges to prevent overflow.
For those who love the classic Baskin-Robbins style approach, this is the perfect time to add a second ice cream flavor. Vanilla or chocolate ice cream creates beautiful contrast against the mint green, both visually and flavor-wise. Apply the same spreading technique, working gently to avoid disturbing your bottom layer.
Sprinkle additional mini chocolate chips or crushed cookies between layers if desired. These little surprises add textural variety and make each bite more interesting. Just remember that less is often more—you want enhancement, not overwhelming complexity.
Step Four: The Critical Freeze
Cover your assembled cake tightly with plastic wrap, ensuring the wrap doesn't touch the surface of your top layer. Place it in the freezer for a minimum of 4 hours, though overnight is ideal. This isn't just about firmness—it's about allowing all the flavors to meld and the textures to reach their optimal state.
During this freeze time, the cookie crust firms up completely, the ice cream layers set to the perfect slicing consistency, and any added sauces or mix-ins integrate beautifully with the surrounding ice cream. Patience here pays dividends in both presentation and taste.
If you're making this mint chocolate chip ice cream cake recipe ahead of time for a party, this is actually the perfect make-ahead dessert. Properly wrapped, it can stay in the freezer for up to a week without losing quality—just add your final toppings right before serving.
Step Five: Finishing Touches and Presentation
About 30 minutes before serving, remove your cake from the freezer and add your final decorative elements. Whipped cream rosettes, chocolate shavings, or a glossy ganache drizzle transform your homemade creation into something that rivals any bakery offering.
For clean removal from your springform pan, run a thin knife around the edges before releasing the sides. If you've lined your pan with parchment paper (highly recommended), lifting becomes even easier. Place your cake on your serving plate while it's still quite firm—this prevents any structural issues during transfer.
The final touch? Fresh mint leaves arranged artfully on top not only look beautiful but release their aroma when your guests lean in for their first bite. It's these small details that elevate your dessert from homemade to restaurant-quality.
Pro Tips for Mint Chocolate Chip Ice Cream Cake Perfection
After making countless ice cream cakes, here are the insider secrets that separate the amateurs from the experts. These aren't just nice-to-know tips—they're the difference between a cake that looks homemade and one that looks professionally crafted.
Temperature Control Mastery
The biggest mistake home bakers make is fighting against temperature rather than working with it. Your kitchen temperature affects everything from how quickly your ice cream softens to how well your toppings adhere. On particularly warm days, work in shorter intervals and don't hesitate to return components to the freezer if they start getting too soft.
Keep a bowl of warm water nearby for cleaning your spatula between layers. A clean, warm spatula spreads ice cream more smoothly than a cold, sticky one. Just dry it thoroughly before continuing—excess water will create ice crystals in your finished cake.
Scaling and Customization Strategies
Want to make this for a larger crowd? The recipe scales beautifully, but maintain the same ratios. For a 10-inch cake, increase everything by about 25%. For individual mini cakes, use muffin tins and adjust freezing time to about 2 hours since smaller portions set more quickly.
Dietary restrictions don't have to derail your plans. Dairy-free ice creams work wonderfully in this application—just choose brands with good texture and fat content for best results. Gluten-free cookies create an equally delicious crust, and coconut whipped cream provides an elegant dairy-free topping option. For more inspiration on dairy-free frozen desserts, see our coconut sorbet recipe.
Serving and Storage Excellence

The moment of truth arrives when you slice into your creation. For clean, professional-looking slices, use a large, sharp knife dipped in warm water between each cut. Wipe the blade clean after each slice to prevent dragging crumbs or melted ice cream from one piece to the next.
Serve immediately after slicing—ice cream cakes wait for no one. Have your plates chilled in the freezer for 10 minutes before plating for an extra professional touch that keeps everything at optimal temperature just a bit longer.
Leftover cake (if there is any) stores beautifully when wrapped tightly in plastic wrap and aluminum foil. It'll maintain quality for up to two weeks in the freezer, making it an excellent make-ahead option for busy hosts. Just remember to add any fresh garnishes right before serving rather than storing them with the cake.
Whether you're recreating that nostalgic mint chocolate chip ice cream cake Baskin Robbins experience at home or putting your own creative spin on this classic, the key is confidence in your technique and quality in your tools. With the right approach and a bit of patience, you'll create a dessert that's not just delicious—it's memorable. For additional tips on baking and dessert prep tools, see our rubber scraper guide.
Troubleshooting Common Challenges
Even with perfect technique, ice cream cakes can present unique challenges. The most common issue? Cracked surfaces during freezing. This happens when temperature fluctuations cause the ice cream to expand and contract. Prevent this by maintaining consistent freezer temperature and avoiding opening the freezer door frequently during the initial freeze.
If your layers start sliding during assembly, your ice cream is too soft. Pop everything back in the freezer for 10-15 minutes and try again. It's better to work in stages than to fight with melting ingredients. Remember, patience is your secret weapon here.
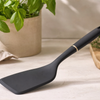
Struggling with uneven layers? Use a bench scraper or large offset spatula to create smooth, level surfaces. DI ORO's flexible spatulas excel at this task—their seamless design prevents catching on frozen elements while their pro-grade silicone maintains flexibility even at freezing temperatures.
Creative Variations Worth Trying
Once you've mastered the basic mint chocolate chip ice cream cake recipe, the creative possibilities multiply exponentially. Try incorporating a brownie layer instead of cookie crust for serious chocolate lovers, or add a layer of chocolate ganache between ice cream layers for restaurant-level decadence.
Seasonal variations keep this dessert interesting year-round. Swap regular chocolate chips for white chocolate during winter holidays, or add crushed peppermint bark for a festive twist. Summer calls for fresh berry garnishes that complement the cool mint beautifully. For another refreshing summer dessert, try our raspberry sorbet recipe.
For those seeking the authentic mint chocolate chip ice cream cake Baskin Robbins experience, focus on achieving those distinct, clean layers and professional-looking chocolate decorations. The key is in the details—precise layering, consistent freezing, and confident finishing touches. For another perspective, Southern Living shares their expert take on mint chocolate ice cream cake.
And if you're looking to pair your frozen masterpiece with something warm and indulgent, don’t miss our Chocolate Caramel Fondue Recipe—it's the perfect dip for fruits, cookies, or even chunks of ice cream cake.
Beyond the Basic Mint Chocolate Chip Cake
Your skills with this mint chocolate chip cake foundation open doors to countless other frozen dessert possibilities. The techniques you've learned—proper ice cream handling, layer construction, and temperature management—apply to virtually any ice cream cake variation you might dream up.
Consider this your gateway dessert into the world of frozen cake artistry. The confidence you build here transfers directly to more complex projects like ice cream roll cakes, frozen mousses, or even elaborate multi-flavor constructions that would make any bakery proud. If you're looking for more celebration-worthy sweets, take a look at our celebration cookies for your next event.
Planning for Special Occasions
This dessert shines brightest when it's the centerpiece of celebration. For birthday parties, add colorful sprinkles between layers for a fun surprise. St. Patrick's Day calls for extra green food coloring in homemade whipped cream and perhaps some gold chocolate coins as garnish.
Summer gatherings benefit from this cake's make-ahead nature. Prepare it completely up to three days in advance, then simply add fresh garnishes before serving. Your guests will never know you weren't stressed about dessert because you were confidently prepared. If you want to explore more kitchen essentials for effortless entertaining, browse our Seamless Series tools.
When friends ask where you found such an amazing mint chocolate chip ice cream cake near me, you can smile and tell them it came from your own kitchen. There's something deeply satisfying about creating bakery-quality results at home, especially when the process is this approachable. For additional inspiration, see this step-by-step ice cream cake guide.
The Tools That Make the Difference
Success in ice cream cake construction relies heavily on having the right equipment. A quality springform pan eliminates the stress of removal, while flexible, heat-resistant spatulas handle the temperature extremes without compromising performance.
Invest in tools that won't let you down when precision matters. When you're working with frozen elements and limited working time, equipment failure isn't just inconvenient—it can derail your entire project. Choose tools designed for professional kitchens but accessible to home cooks.
The satisfaction of creating something this impressive with your own hands, using reliable tools and proven techniques, builds the kind of kitchen confidence that transforms how you approach all your culinary adventures. Each successful layer, each clean slice, each delighted guest reaction reinforces that you're capable of more than you might have imagined.
Your Mint Chocolate Chip Ice Cream Cake Success Story
Creating the perfect mint chocolate chip ice cream cake isn't about following a recipe perfectly—it's about understanding the principles behind each step and adapting them to your unique situation. Whether you're working in a tiny apartment kitchen or a spacious culinary haven, these techniques scale to meet your needs and exceed your expectations.
The beauty of this dessert lies not just in its impressive appearance or refreshing flavor, but in the confidence it builds. Each successful cake reinforces that you're capable of creating something truly special, something that brings people together and creates lasting memories. That's the real magic happening in your kitchen—not just the transformation of simple ingredients into something extraordinary, but the transformation of you into someone who creates extraordinary experiences for the people you care about.
